AI tools
How to film a green screen that keys cleanly — and when you don't need one
We keyed a real studio clip as filmed and cropped to its screen, dimmed the screen on one side to see what uneven light does, and gave the same clip to an AI that ignores the screen.
By the Cutlia team · Published · 15 min read
The short version
- Make the screen fill everything behind the subject, or crop the video to the screen before keying: a key replaces only the screen, which was 22% of our studio frame, and once we cropped to it the editor found the screen by itself and keyed it over every picture we tried.
- Light the screen evenly: with its light falling off to 40% across the frame, the editor no longer recognized it as a screen, and at the starting “Amount” 10% to 72% of it stayed in the picture, depending on where the color came from.
- On an unevenly lit screen, pick the color from its bright part and raise “Amount” only as far as needed: picked there, 60% cleared it completely; picked from the dark part, 60.7% of the screen stayed even at 70%.
- Keep “Remove the screen's glow” on: it took the share of greenish pixels in our presenter's curls from 12.2% to 0.2%.
- You can skip the screen when the subject is a person: the AI kept both people in our studio and replaced the room around them, 80.4% of the picture, but it keeps people only, left green between the curls, and exporting with it took many times longer.
A green screen is a bet: if everything behind you is one even color found nowhere else in the shot, software can swap it for anything. Lose the bet — a shadow across the cloth, a lime sweater, a screen narrower than the shot — and the key leaves patches of studio behind or eats holes in the person. Most of those problems are settled while filming, not in the editor.
To see which matter most, we used a real clip: 14 seconds from VOA Learning English, filmed upright at 1080 × 1920, with a presenter in front of a pop-up green screen and a colleague beside it. In Cutlia's Background Remover we keyed it as it was filmed and with its sliders pushed too far; we cropped it to the screen in Resize & Crop and put it in front of Earth, a coral reef and a rocket launch; we dimmed the screen on one side to see what uneven light does; and we gave the same clip to the tool's AI, which ignores the screen. It all ran in Chrome on a MacBook Air with an Apple M5 chip, and no file left the laptop.
What a chroma key actually measures
A chroma key decides, pixel by pixel, how much of the picture is screen. Cutlia's key splits each pixel's color into its brightness and its chroma: which way the color leans and how strongly. It then measures how far a pixel's chroma is from the screen's, divided by the screen's own: 0 is the screen's color, 1 is as far from it as a neutral gray. Because the scale is relative, the same settings work for a vivid screen and a dull one.
Brightness counts only through chroma. A shadow keeps the screen's hue but weakens its color, so a patch of screen at 70% of its brightness sits at 0.3 on that scale, and a patch at half its brightness at 0.5. Three sliders work on the scale:
- “Amount” (42% at the start, 10% to 85%): everything closer to the screen than this goes.
- “Edge softness” (22%, from 2% to 60%): the stretch above that over which pixels fade from removed to kept. At the starting settings that's 0.42 to 0.64; hair, motion blur and other soft edges live there.
- “Remove the screen's glow” (85%): in what stays, takes out the part of the color that leans toward the screen, and keeps the brightness. That's the screen's light bounced onto the subject.
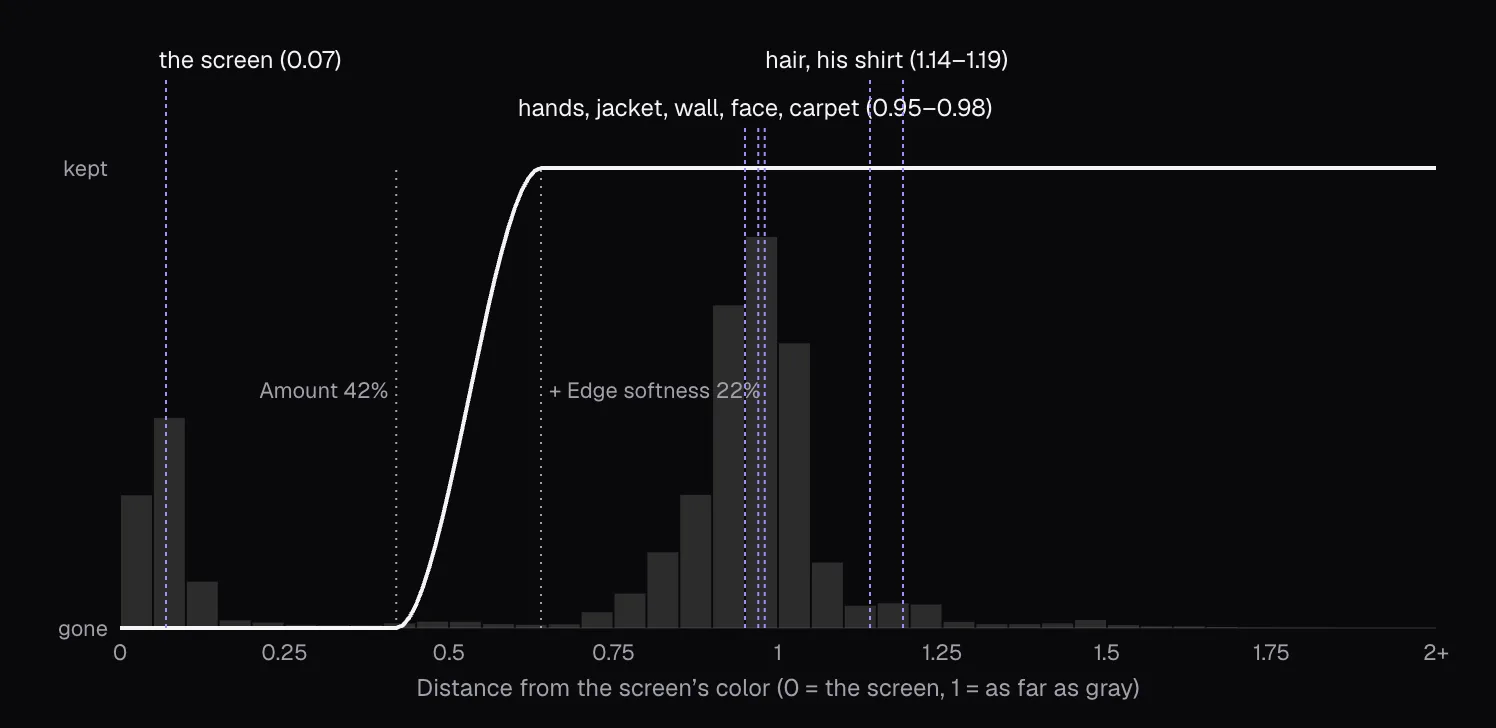
In our frame the screen sat at 0.07. Her hands, face and jacket, the wall and the carpet all sat between 0.95 and 0.98, about as far from this pale mint as gray is, and her reddish hair and the colleague's maroon shirt beyond that, at 1.14 and 1.19, because red leans the opposite way from green. Only 2.3% of the frame's pixels fell between 0.2 and 0.7, so the starting settings had a wide gap to work in. Each pixel's opacity is also averaged with its eight neighbors, so compression noise in the screen doesn't leave speckles behind.
A real studio clip: why the screen wasn't found
The screen in VOA's clip covers about a fifth of the picture. Around it are acoustic panels, a lighting grid, a chair, the colleague, a gray carpet, VOA's logo and burned-in captions. When a video opens, the editor looks for a screen in three frames, at a tenth, half and nine tenths of the clip, along the outer band of the picture: strongly green or blue pixels must fill 35% of that band in two of the three, and be evenly colored. Ours filled 14% to 19%, so the clip opened with “Background · AI” and we switched to “Green screen”.
| What we measured | Result |
|---|---|
| The file | 1080 × 1920, 30 fps, VP9 picture, 5.4 MB for 14.2 seconds |
| Screen's share of the picture | 20.6% |
| Screen's share of the outer band | 14.1%, 19.0% and 18.2% in the three frames (35% needed) |
| Color the editor starts from | #00B140, a typical keying cloth |
| Color picked from the video | #79FFA0, a pale mint |
| Screen pixels with green at 250 or more of 255 | 94.5% |
| Picture replaced by the key at 0:06 | 22.3% |
The screen was lit hard: its green channel was at or near its maximum almost everywhere, which turned it a washed-out mint with a color strength of 0.273, against 0.356 for a typical keying cloth and 0.596 for pure green. It still keyed well because it was even: nine in ten of its pixels had a brightness between 81% and 87%. The relative scale also made the exact color matter little. Even the cloth green the editor starts from takes out 97.5% of this screen's pixels at the starting settings.
What the key couldn't do was reach past the screen. At 0:06 it replaced 22.3% of the picture: the screen and nothing else. The studio, the colleague and VOA's logo stayed, as the comparison further down shows.
Make the screen bigger than the shot — or crop to it
Apple's Final Cut Pro guide treats this as routine: light stands, microphone booms and the edges of the backdrop often end up in the shot, and you mask them out before keying. Cutlia has no mask, but a crop does the same job while the subject stays inside the screen. In Resize & Crop we chose “Free crop”, drew the box inside the screen (58% of the picture's width and 46% of its height) and exported it at 720p, 720 × 1016.
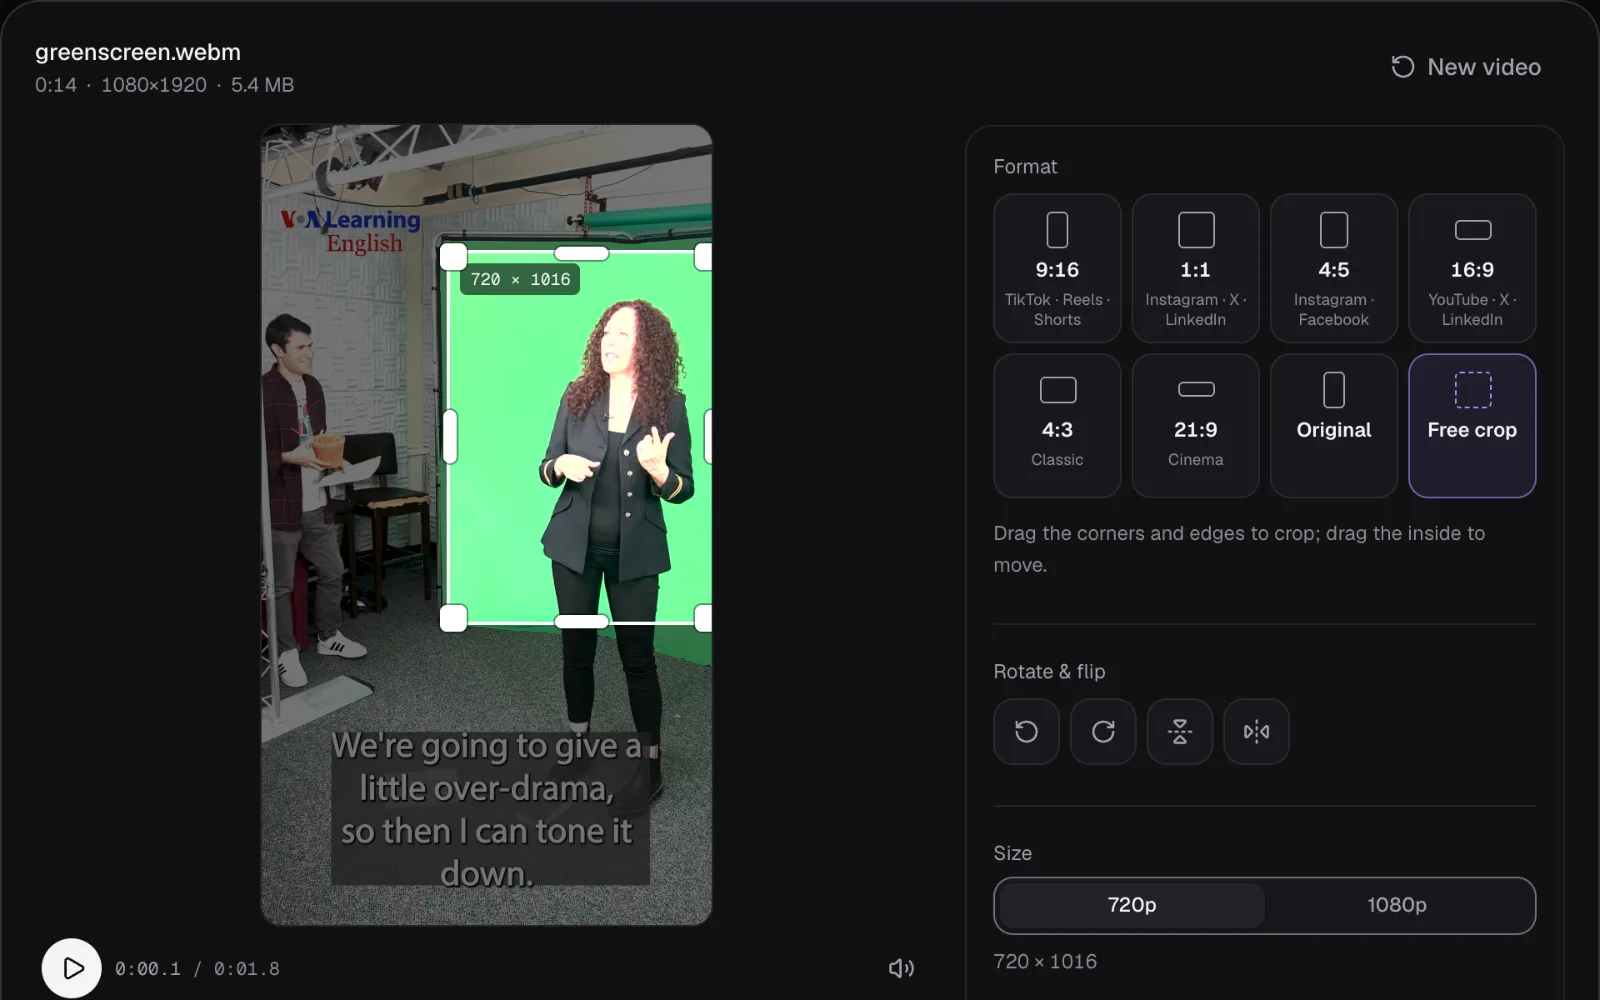
The camera drifts during the clip, and later on the presenter spreads her arms past the screen's edge. We kept the 1.8 seconds from 0:00.8 to 0:02.6, where the crop stays inside the screen and she stays inside the crop. A crop edge she crosses becomes a hard line in the middle of the new picture, so choose the part before you choose the box.
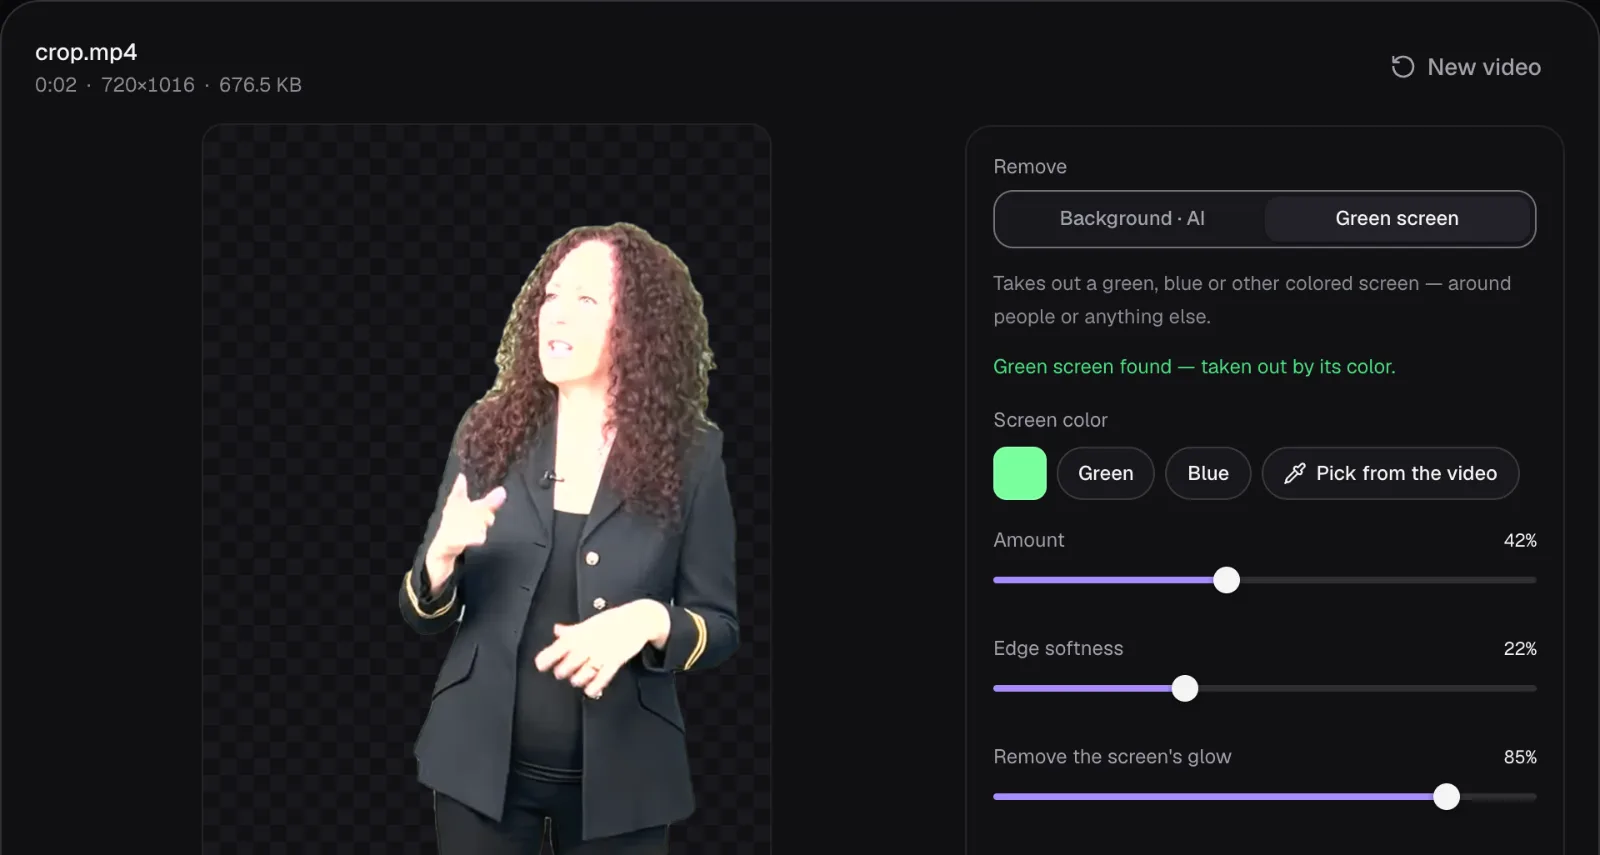
Cropped, the screen filled 84% to 87% of the outer band, and the editor recognized it by itself:
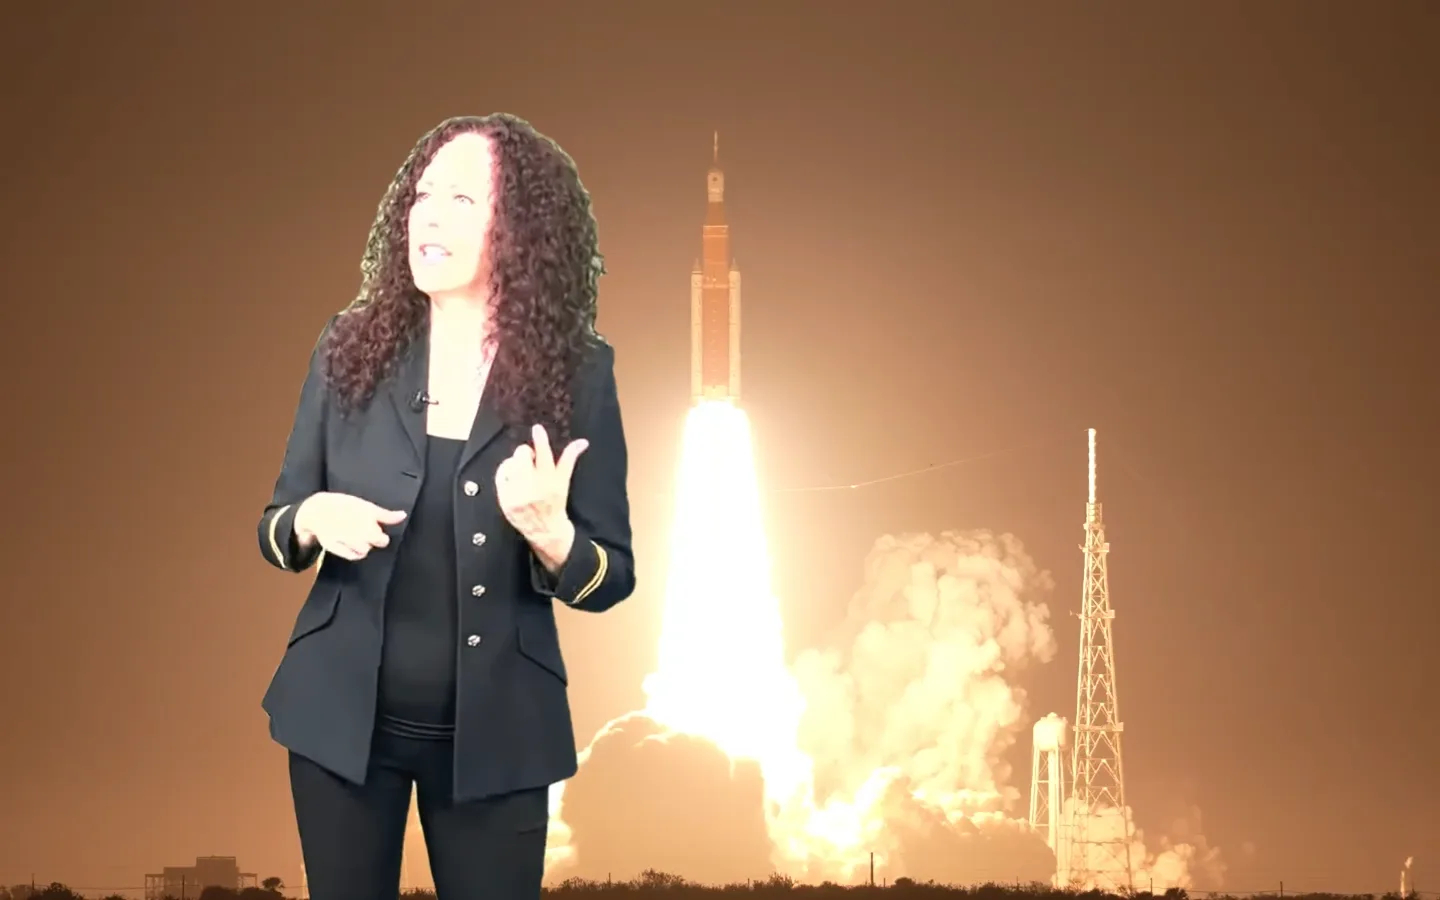
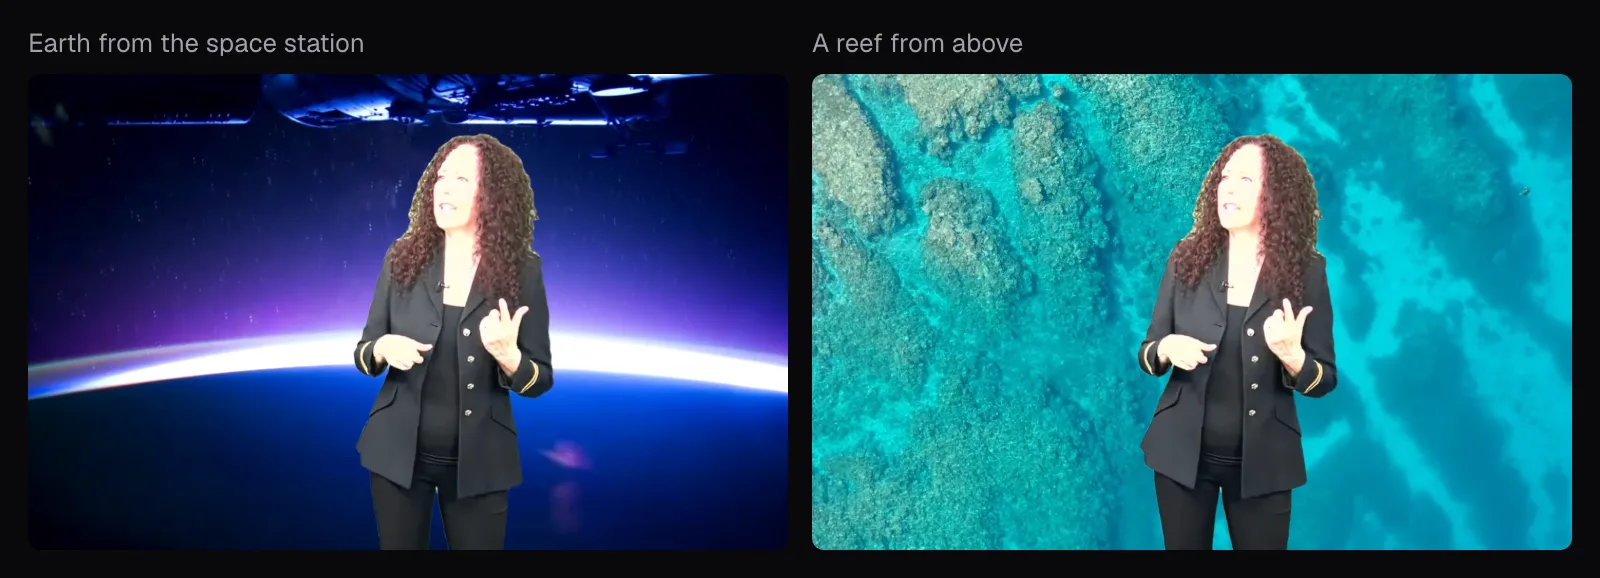
With “Picture” as the background and the frame set to “Like the background”, the cut-out stood in a 1440 × 900 frame, at its full height. We put three still frames of other footage behind it: Earth from the space station, a reef seen from a drone, and the Artemis I launch, where we moved her left of the rocket with the arrow keys. Nothing else changed between them.
When you film, the same lesson costs nothing:
- Let the screen fill everything behind the subject for the whole shot, with room for the widest gesture.
- For a full-length shot, run the screen under the feet; our presenter stood on carpet, and it stayed.
- Keep logos and captions off footage you plan to key. Burned-in text isn't the screen's color, so the key leaves it in the picture; in VOA's clip both sit outside the screen, and our crop left them out.
Light the screen evenly: what a falloff does to the key
Apple's keying guide names the shoot as a challenging part of a good key, and asks for “a good, well-lit background that provides a uniform color to remove.” VOA's screen was uniform. To see what happens when one isn't, we took a frame of the cropped clip and dimmed the screen, and only the screen, from full brightness at its left edge to 40% at its right, roughly as one light from the left side would leave it. We made that frame into a two-second video and opened it in the editor.
The first thing that broke was recognition. The dimmed screen still filled 78% of the outer band, but its color varied too much from one side to the other to count as evenly colored, so the editor chose the AI. Under “Green screen”, we keyed it with three colors at four settings of “Amount”, and measured from the transparent exports how much of the screen stayed and how much of the presenter went, as their average opacity:
| Color keyed | Amount 42% | 50% | 60% | 70% |
|---|---|---|---|---|
| “Green” (#00B140) | 25.7% of the screen left | 17.0% | 2.9%, 0.1% of her gone | 0%, 1.3% of her gone |
| Picked on the bright side | 9.7% left | 1.2% | 0%, 0.3% of her gone | 0%, 3.2% of her gone |
| Picked on the dark side | 72.4% left, 0.9% of her gone | 70.5%, 2.7% of her gone | 66.8%, 7.9% of her gone | 60.7%, 21.9% of her gone |
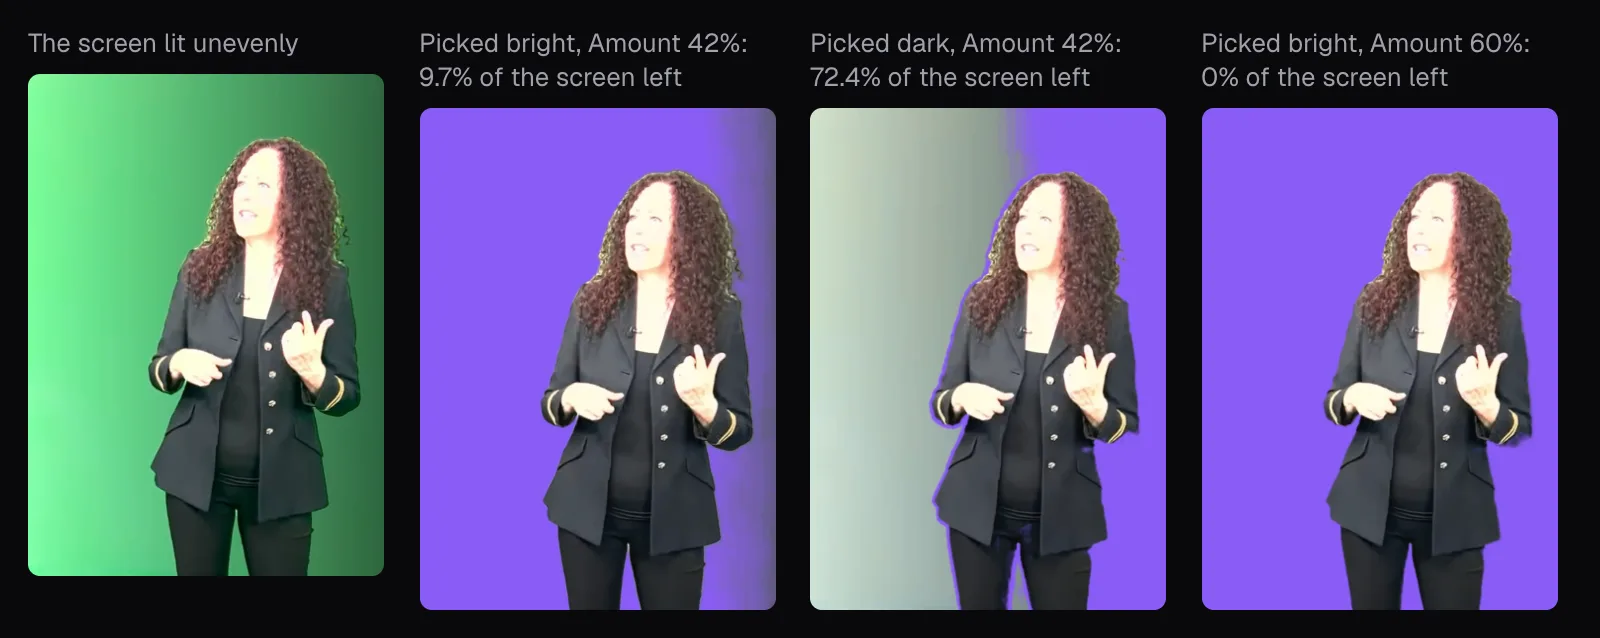
The reason is the relative scale. A dimmer patch of screen is a grayer version of the bright part, so measured from the bright part it's partway to gray, and raising “Amount” reaches it. Measured from the dark part, the bright screen lies further away than gray does: at 70%, 60.7% of the screen still stayed and 21.9% of the presenter had gone. The key's own math puts numbers on a shadow: at the starting settings, a patch of our screen at 58% of its brightness still goes completely, one at half stays at 30% opacity, one at 40% at 91%.
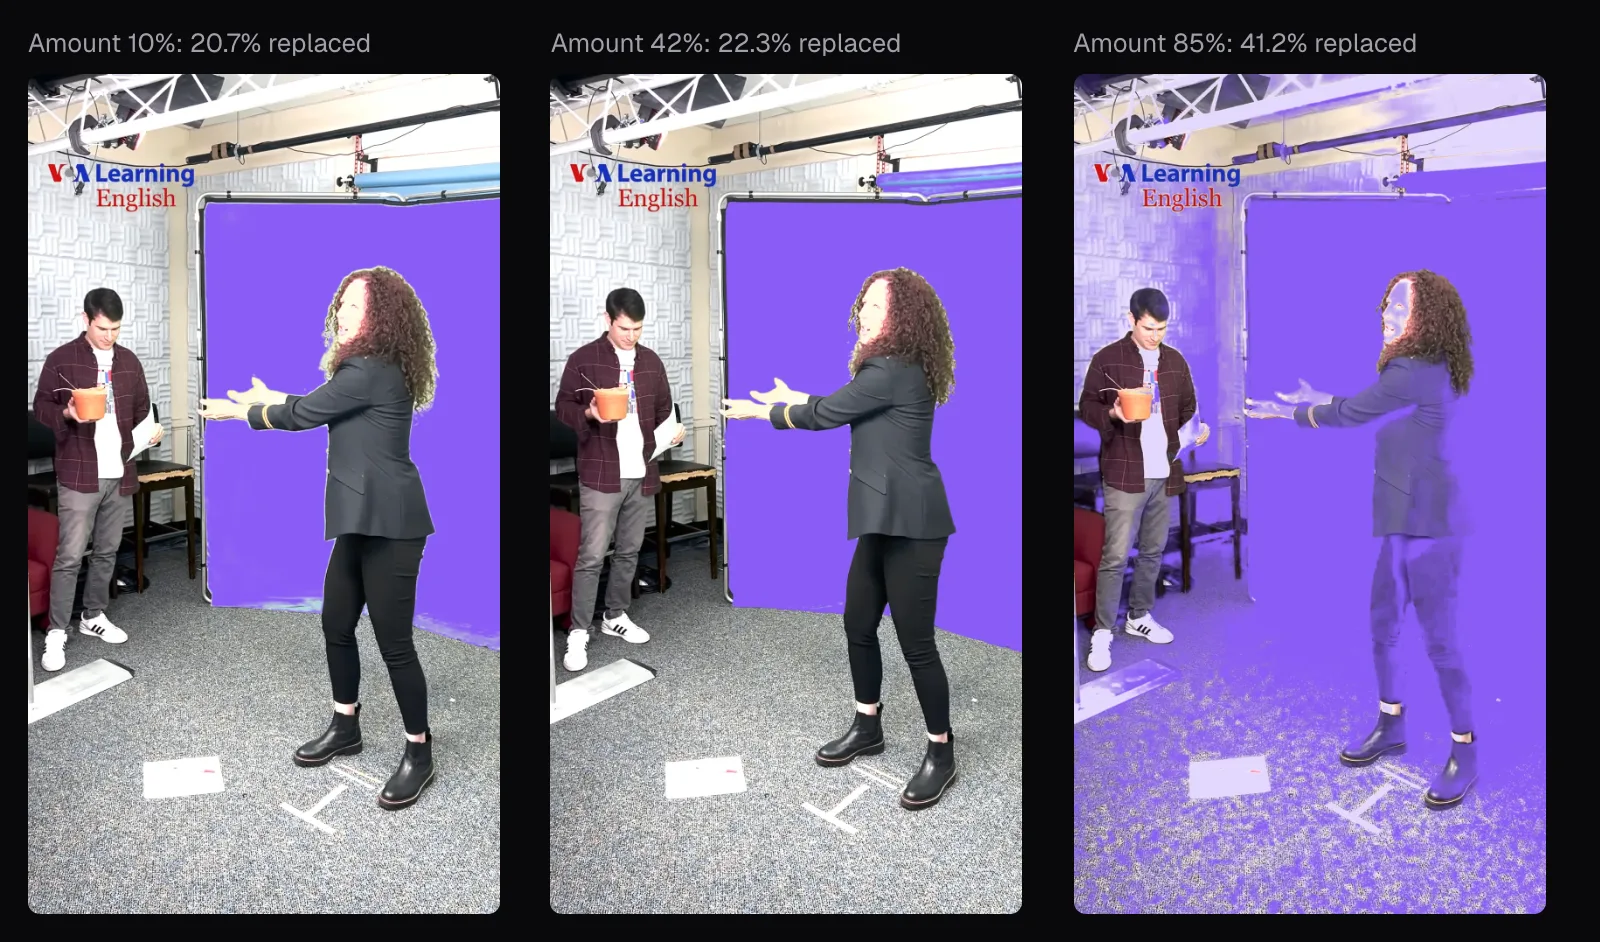
Raising “Amount” has a price, and the full clip shows it. At 85%, the top of the slider, even a neutral gray is only 76% opaque by the key's math. Her black jacket and her face turned partly see-through, the wall and the carpet took on a violet cast, and 41.2% of the frame was replaced at 0:06, against 22.3% at the start. At 10%, the bottom, the key replaced 20.7%, and the darker strip where the screen meets the floor stayed.
Spill: the green glow on hair and skin
Light that hits the screen bounces back onto the subject, carrying its color. Apple's guides call it spill: the screen's color “reflecting (or spilling) onto the foreground subject.” You see it as a green rim on hair, shoulders and cheeks, and in our clip the presenter's dark curls carry one where they meet the screen.
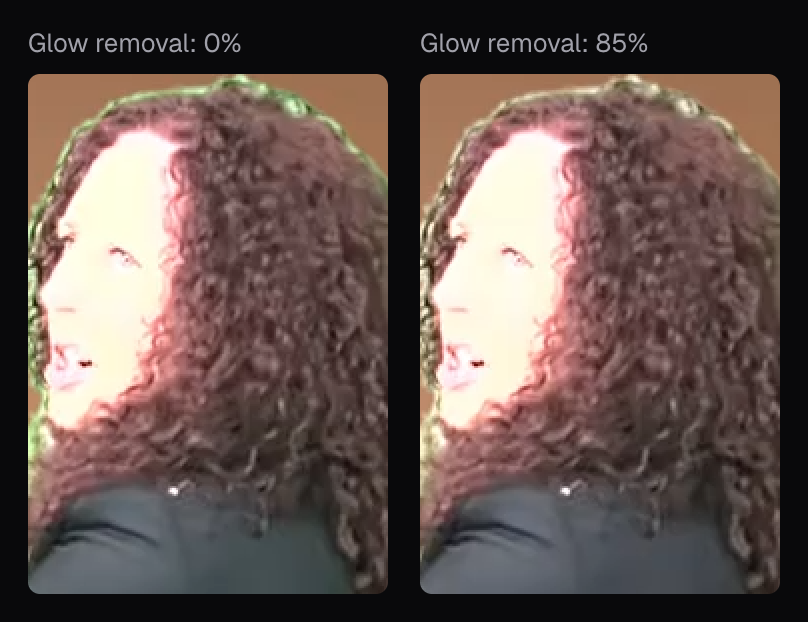
In a crop of her hair and shoulder at 0:06, 12.3% of the pixels that weren't screen were greener than they were red or blue. Keyed with “Remove the screen's glow” at 0%, 12.2% of the kept pixels still were; at the starting 85%, 0.2%. The slider subtracts the screen's color from what stays and keeps its brightness, so a green rim turns gray. It can't tell spill from a green scarf, though: anything green the subject wears loses its color too.
That's one reason clothing color matters while filming; the other is that a green close to the screen's is keyed out with it. Apple's Final Cut Pro for iPad guide asks for a subject who is “not wearing any items the same color as the background,” and its iMovie guide is specific: someone who wears green belongs in front of a blue screen, someone in blue in front of a green one. Cutlia's “Blue” button and “Pick from the video” handle either.
Hair, hands and fast movement, at actual pixels
Edges are where keys succeed or fail, and they're easiest to judge at actual size. We cropped the same two spots from the original and from both exports over the launch: her curls at 0:06, and her hands at 0:05.2, as they sweep across the screen.
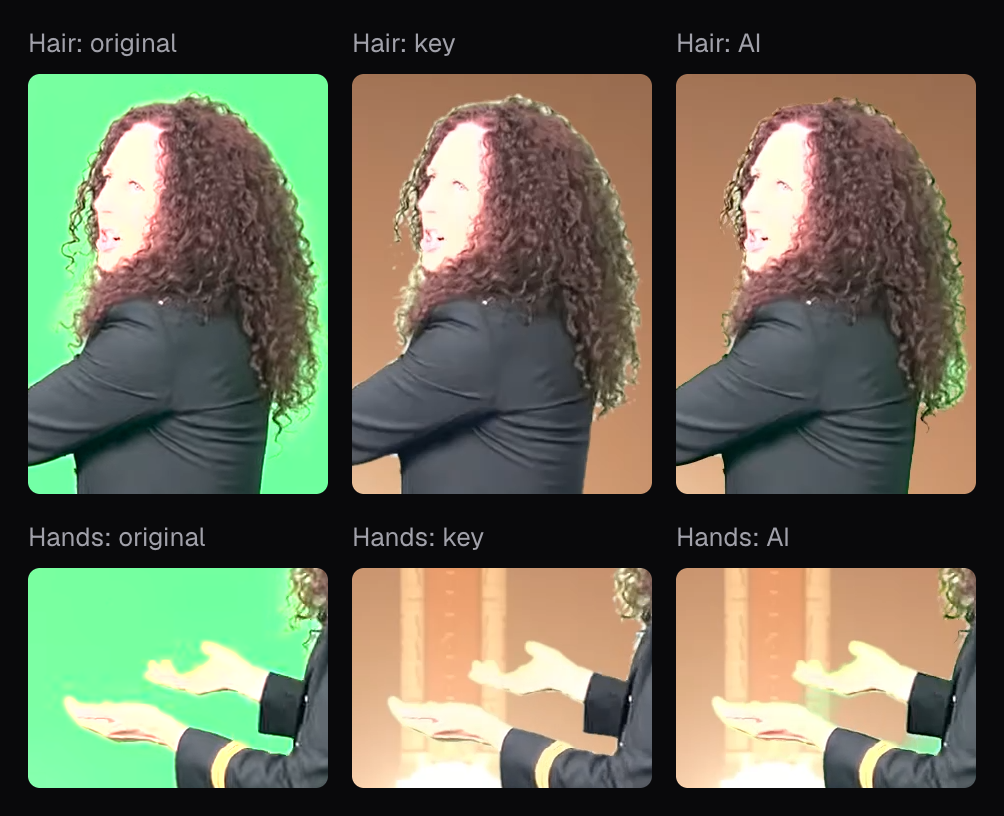
The curls show the difference between the two methods. The key measures every pixel, so the screen between the outer curls goes and the curls keep their own color. The AI works out where the person is and cuts around her; in the same crop 10.1% of the pixels it kept were still greenish, against the key's 0.2%.
The hands are the hard case. A hand that crosses the screen within a frame's exposure leaves a smear that is part hand, part green, and her hands were also overexposed to a pale yellow. The key treated the smear as partly screen and left the hands pale and partly see-through; the AI kept them whole, green tint and all.
Compression is the last edge problem. Apple advises “to avoid using a highly compressed video format,” and its keyer has a setting that smooths the jagged edges left by keying compressed video. Ours was a 5.4 MB file for 14 seconds of 1080 × 1920; record at your camera's highest quality if you plan to key. Our bitrate guide explains what that buys.
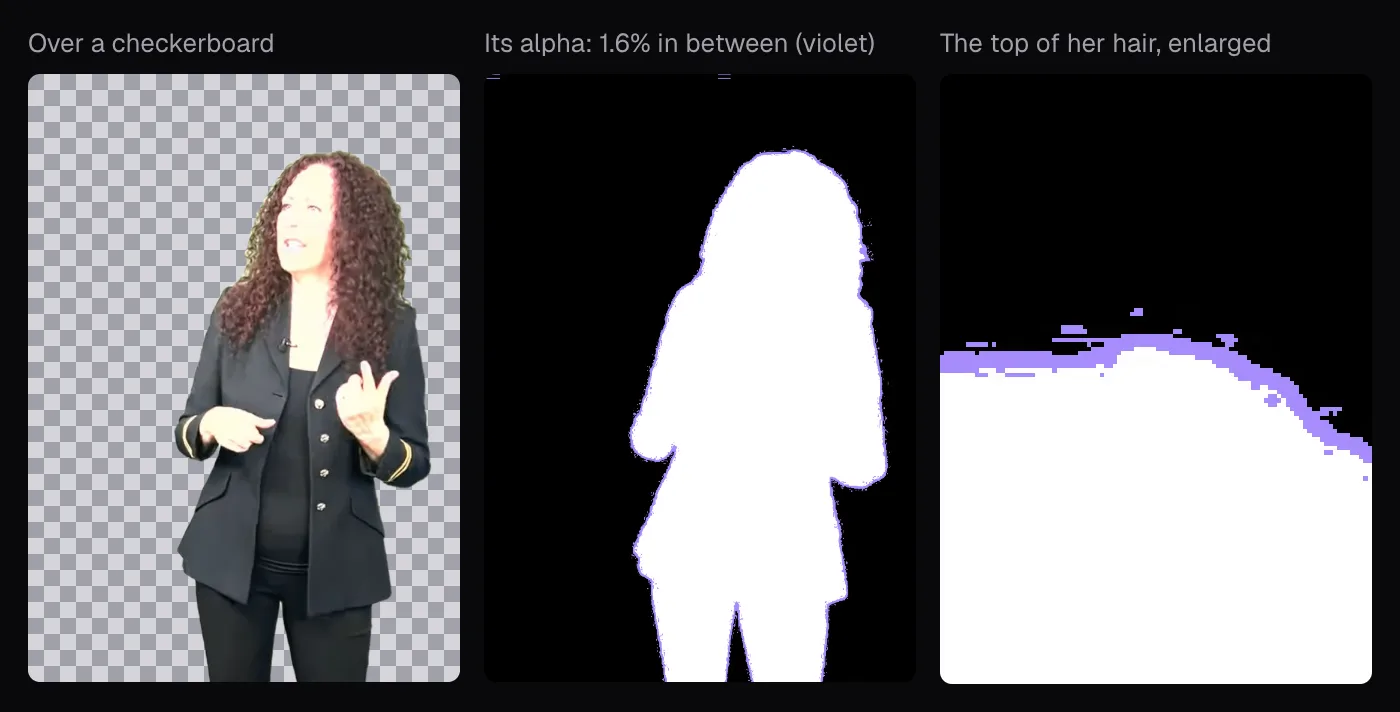
To use the cut-out in another app, choose “None” as the background: the export is a WebM with VP9 picture and a transparency channel. In a frame of our cropped clip's file, 62.1% of the pixels were fully clear, 36.3% fully solid, and 1.6% in between: a band a few pixels wide around her outline, which blends into whatever goes behind it.
A transparent WebM keeps its see-through background only where the player or editor reads that channel; Chrome did, which is how we measured ours. For one that doesn't, the tool's own hint is to choose green instead, and key it out there.
When you don't need a green screen at all
“Background · AI” ignores color and looks for people. It runs two of Google's MediaPipe models in the browser: a selfie segmenter, which Google says “can be used for replacing or modifying the background in an image,” and a pose model whose outline of the body covered whole figures better in Cutlia's own tests. It doesn't care what's behind the people or how big the screen is.
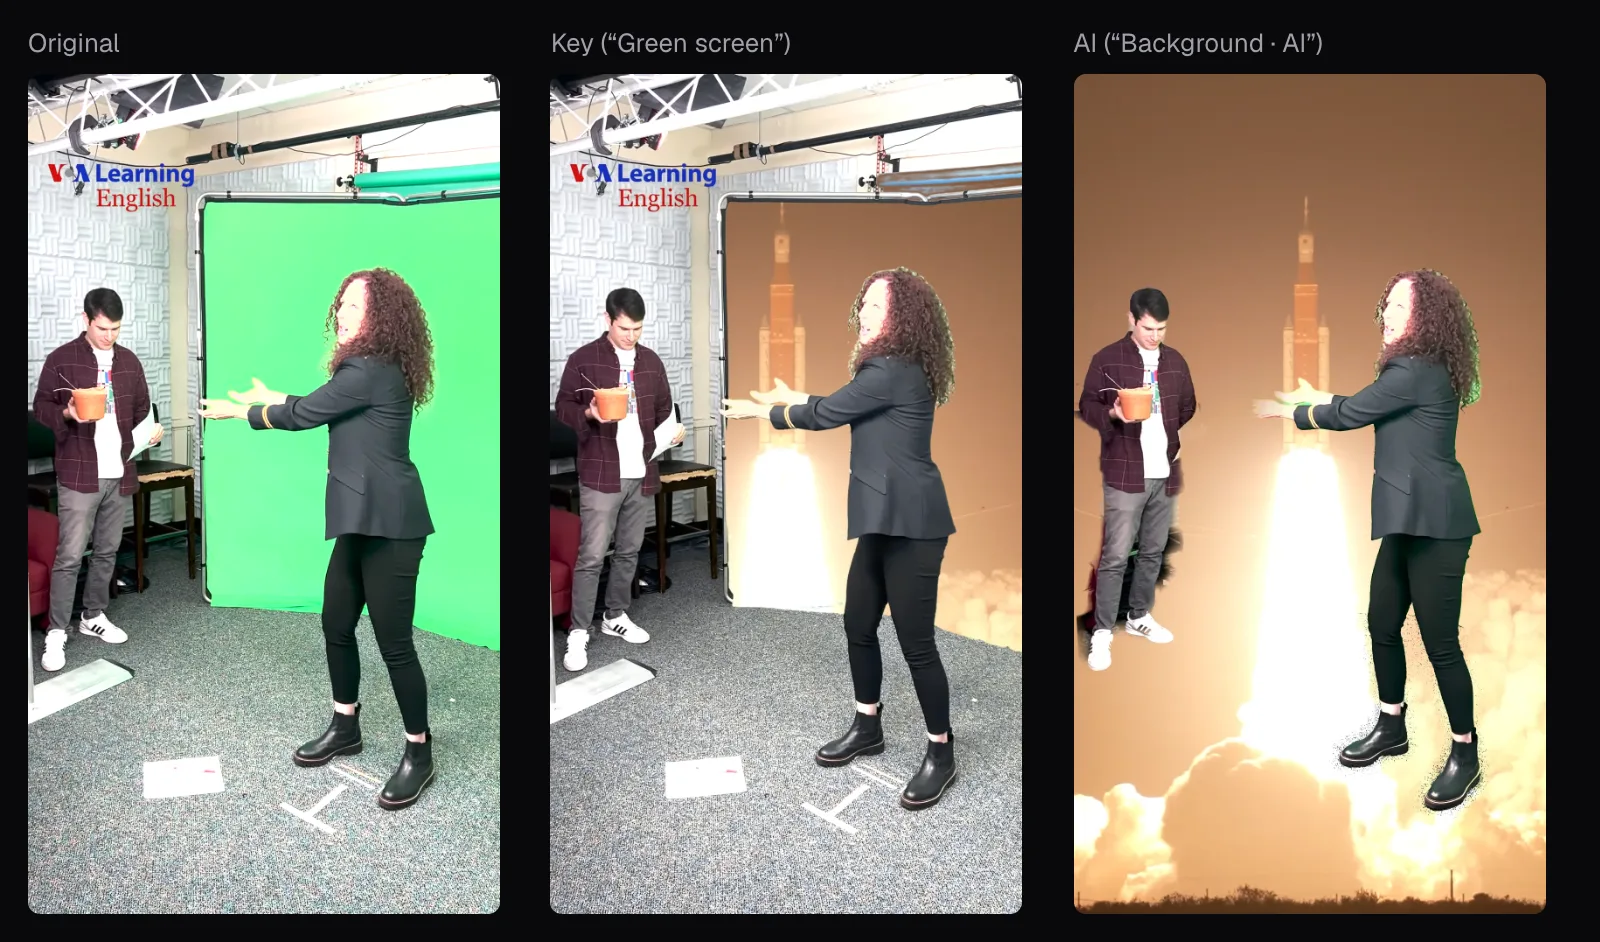
On our clip it kept both people and replaced 80.4% of the picture at 0:06, against the key's 22.3%: the studio, the logo and the carpet went, the orange flowerpot in the colleague's hands stayed. It wasn't flawless: scraps of the studio behind the colleague clung to both sides of his legs, and specks of carpet ringed her boots. It was slower too. Exporting the 14-second clip took 21.1 seconds with the AI and 2.4 with the key, the middle of three runs each.
Its real job is footage that never had a screen: a person filmed at a desk, in a kitchen, on a street. The limit is that it keeps people, and only people; a product, a pet or a toy needs a screen. With no one in the frame, the editor says “No one found in this frame” rather than leave an empty background without a word. Both methods run in the browser tab, and the video is never uploaded; here's why that matters.
Screen or AI: which to choose for your shot
| Your shot | Use | Why |
|---|---|---|
| A person, filmed anywhere | The AI | No screen or lights to set up |
| A product, a pet, a toy | A green or blue screen | The AI keeps people only |
| Curly or flyaway hair, on a good screen | The key | It cleared the curls the AI left green |
| A screen smaller than the shot | Crop to it first, or the AI | The key replaces only the screen |
| A screen lit unevenly | The key, color picked on the bright side | Then raise “Amount” until it clears |
| Someone dressed in green | A blue screen, or the AI | A green key takes green clothes with it |
| Footage for another app's chroma key | Green Screen Video Maker | The AI puts flat, pure green behind the person |
If you film on a screen, make it fill the frame, light it evenly, keep wrinkles and shadows off it, and dress the subject in colors it doesn't share. Then open the file in Remove Green Screen, which starts with the color key, or in Change Video Background to put a picture or a video behind straight away.
The tools in this guide
Background Remover
No green screen needed — the AI keeps the people, you choose what goes behind.
Remove Green Screen
Chroma key in your browser: the screen goes, and its glow on hair goes with it.
Green Screen Video Maker
Film anywhere — get green-screen footage for any editor.
Change Video Background
Put yourself anywhere: a picture, a place, gameplay or slides behind you.
Resize & Crop
One click to the right aspect ratio for every platform.
Questions people ask
Should I use a green screen or a blue screen?
Pick the color your subject doesn't wear. Apple's iMovie guide says to film someone in green in front of a blue screen, and someone in blue in front of a green one. Cutlia's editor looks for either kind when a video opens, and its “Blue” button or “Pick from the video” sets the key to a blue screen.
Why didn't Cutlia detect my green screen?
It looks at three frames and needs strongly green or blue pixels to fill 35% of the picture's outer band in two of them, evenly colored. Our studio screen filled 14% to 19%, and a screen we dimmed on one side failed the evenness test. Switch to “Green screen” and use “Pick from the video” on its brightest part; cropping to the screen also helps.
Why is there a green outline around my subject after keying?
That's spill: the screen's light bounced onto hair and edges. Keep “Remove the screen's glow” high; in our test it cut the greenish pixels in a hair crop from 12.2% to 0.2%. Patches of screen left in the picture are a different problem: darker parts of the screen, further from the picked color than “Amount” reaches. Raise it step by step.
Can I use a green bedsheet or a painted wall as a screen?
It can work if it's one strong color, lit evenly, though the backdrops Apple's keying guide names are made for the job, from chroma key paint to chroma key cloth or paper sheets. Stretch a sheet flat, since a wrinkle's shadow is a darker patch of screen: in our test a screen falling off to 40% brightness was no longer recognized, and with its color picked on the bright side it needed “Amount” at 60% to clear completely.
Do I need a green screen to remove a background from a video?
Not for people. Cutlia's AI finds them in ordinary footage; on our studio clip it replaced 80.4% of the frame, room and all, against 22.3% for the key. A screen still wins for objects and animals, which the AI doesn't keep, and in our test for curly hair, which the key cleared better.
How do I make a video with a transparent background?
Choose “None” as the background; it's offered where the browser can encode VP9 video, as Chrome can. The export is a WebM file with VP9 picture and a transparency channel, for players and editors that read it; Chrome did when we measured ours. In a frame of our cut-out, 1.6% of the pixels were partly transparent, a thin band around her outline. For an editor that ignores transparency, export over green and key it there.
Sources
Where the facts in this guide come from, besides our own tests:
- Use the Green Screen Keyer effect in Final Cut Pro for Mac — Apple Support
- Finalize a key in Final Cut Pro for Mac — Apple Support
- Use the Green Screen Keyer in Final Cut Pro for iPad — Apple Support
- Use green-screen in iMovie to add a background to a clip — Apple Support
- Image Segmenter — Google AI Edge
- Pose Landmarker — Google AI Edge
Footage in this guide
The pictures were made with Cutlia's tools from this openly licensed footage, found on Wikimedia Commons:
- Filming with the green screen — VOA Learning English, Public domain
- Artemis I Launch from NASA Causeway (Slo Mo) (GX010506) — NASA Marshall Space Flight Center, Public domain
- Earth Illuminated- ISS Time-lapse Photography — NASA Johnson Space Center, Public domain
- Aerial view of a green sea turtle (Chelonia mydas) swimming in the reef at Lady Musgrave Island, Queensland, Australia — Adam Fish, CC BY 3.0